Sunday, June 20, 2010

Check This Cool Little Gadget Out!! Try it Before You Buy It!


Sephora just came out with this genius tool for their Sephora for OPI Polishes. You can choose your skin tone, nail length, and nail shape, then click the color swatches to see what each shade looks like on your hands before you fork out the cash for their polishes. I love it!! Try it out here
SEPHORA VIRTUAL POLISH CHANGE
Continue reading...

Wednesday, June 16, 2010

Attention!! I am willing to CP for Instant Chic blush if any of my subscribers are interested!


I am not CPing for anyone except those who subscribe to my blog, sorry. If anyone is interested please leave a comment in the box that includes your e-mail address. I will be picking up the blushes on Thursday and sending out the invoices on Thursday night or Friday morning.
Continue reading...

Wednesday, June 9, 2010

MAC Lustre Drops in Pink Rebel- Rating: ♥♥♥♥♥


This product was originally release with the Style Warriors collection and now re-released with the To The Beach collection. The Lustre Drops are sold for $18.50 in both collections. The bottle is very small so the price seemed a little steep to me. I got over the price quickly once I swatched them and went ahead and bought them, but I will be stalking my CCO for my next bottle.

It was love at first swatch for me. This stuff gives me the most gorgeous dewy glow I have ever gotten from a highlighting product. It gives a nice light pinkish/golden glow. There is no glitter in this stuff. It leaves what I would describe as a frosty/duo chrome finish. The finish kind of reminds me of the finish of Petticoat MSF or Spaced Out blush, not the color, just the finish.

When applied Pink Rebel seems to just soak into the skin. It leaves no stickiness or powderiness behind, which I love. You can wear it alone for a simple fresh look or add a pop of color with your favorite blush on the apples of your cheeks. Either way it looks amazing. I love it!
Continue reading...

Sunday, June 6, 2010

Maybelline Lash Stiletto Vulumptous Waterproof Mascara in Very Black- Rating: ♥♥♥♥


I use this mascara everyday and keep a new one in my drawer at all times. This mascara does exactly "what I need it to". Notice, I didn't say "what it says". My lashes are what I would describe as on the normal side in length but are a light brown/ blond color on the ends, so they appear shorter than they actually are. I have a pretty good amount of lashes, but the individual lashes are very fine. So, when I look for a mascara I look for one that will accentuate each one of my lashes by adding a little volume and most importantly lots of length. I do not believe in so called "daytime lashes". I like long dramatic "doe eyed lashes" all day, everyday. This is by far the best lengthening mascara I have ever tried from the drugstore.

The voluptuousness of this mascara may not be enough for some. It does add some volume to each lash, but not as much as say, L'oreal's Voluminous Mascara does. I really don't mind because  I do get enough volume from the Lash Stiletto, and it has never clumped on me,  and I coat my lashes down with it. Lash Stiletto leaves me with dramatic long, glossy, flake free lashes that last all day.

The formula can be a pain to remove if you do not use an eye makeup remover, but that's what makes it so great. No matter the weather or tear jerking movie my lashes don't budge.

PRO'S
Price
Convenient to purchase
Very Lengthening
No Clumps
No Flakes
No Spider leg lashes
No Smearing
Holds Curl well
Dark Black Color

♥ Cons
Can be hard to remove (if you want to say that is a bad thing, I don't)
Weird "S" looking brush that takes some getting used to
Not a lot of volume 
Continue reading...

Saturday, June 5, 2010

Mark Pro Bronze Bronzing Powder- Bronze- Rating: ♥♥♥♥♥


I usually don't buy Mark/Avon products. This will probably be the only Avon/Mark related review I will ever post. Most of the Avon/Mark products I have purchased in the past have been poorly pigmented and just not what I expected in one way or another. This product is my only exception, and I have and will continue to repurchase it as long as it is not ever discontinued. This is good stuff!

I've had this particular compact of Mark Pro Bronze in the shade Bronze for 2 summers now, and my pan is no where in sight. This stuff lasts me forever. Grant it, I use it mostly in the summer months for a sun kissed glow. This bronzer does contain some micro fine shimmer that is slightly visible in the pan. Once you apply it to you skin the shimmer is barely visible at all. I tend to prefer a bronzer with little to no shimmer. It's not that I don't like a little shimmer (no glitter, please). I just like to have the choice of how much. So, for days that I want a little more I just add a shimmery Mineralize Skin Finish or a nice pop of shimmery blush on top. I very seldom ever wear only bronzer on my cheeks. I'm just a blush whore like that, but it's really what ever you like. That's just me.

Another great thing about this bronzer is that it provides a natural looking color. Some bronzers can have a orangy/fake tan tint to them, or have an ashy/gray looking haze. I do not have any of these problems from this bronzer. I just get that natural healthy looking bronzed glow that we all love. I'm not saying that this bronzer would or wouldn't work for all skin tones, but for my NC25/NC30 tone it is perfect.

Now, for the life of me I can't remember how much I paid for this bronzer back when I bought it, but the Avon Website gives the price of $10. You can order it off the website or from your local Avon representative. If you are not sure who she is there is also a tool on the site to help you find her. I really hope that if you are looking for a great natural looking bronzer for a very affordable price you will give this stuff a try. I love it!
Continue reading...

Friday, June 4, 2010

Jergens Natural Glow Revitalizing Daily Moisturizer for Medium Skin (gradual self-tanner) Rating: ♥♥♥♥♥


Let me start by letting you know that I am not a pro at self-tanner. I know that lots of girls know how to apply self-tanners of any kind with out getting streaks. I am not one of those girls. I need a product that is fool proof. This one is the easiest I have found to apply while still giving the appearance of a natural tan. There are just a few tips I use to insure a streak less finish.

First, I always shave or wax my legs. It just seems to leave a more even finish this way.

Then, I exfoliate the areas where I will be applying the self-tanner.

After, I exfoliate I apply the self-tanner to my legs, arms, stomach, chest, and neck. I do not apply this to my feet and hands. When I apply it to my legs I squirt the product in my hand and start in the middle of the calf portion of my leg I blend downward toward my ankle and then upward toward my knee. When there is barely any product left on my hand I blend it into my knee, with my knee bent. Be very careful about how much product you apply to the knee, because to much will make you look like you have dirty knees. I apply the self-tanner to my thighs, arms, and stomach the same way as I did on my calf. Starting in the middle and blending down and up. On my neck and chest I do it the same way as well, I just use very little product.

Finally, when you have finished applying the product to the areas that you want, do not get dressed immediately. You have to let the product dry on your skin before you get dressed. Otherwise your clothes can rub off the self-tanner and cause a patchy look. I always take this time to cleanse my face, brush my teeth, and get ready for bed. You could even stand in front of a fan for a few minutes.

Also, I like to apply my self-tanner at night that way I can see my results in the morning and if I have any problem areas I can fix them before I leave out for the day. If you have a light spot just add a tad bit more product to the spot and blend, blend, blend. If you have a dark spot take an old tooth brush and lightly rub the spot.

I hope that this helps to get you started on your sunless tanning routine. I have used this product for the past 3 summers to get a great faux tan. In my younger dumber years I did go to the tanning bed every now and then, but I was really never a "fake baker", you know the kind who goes like religion. But even seldom visits to the tanning bed are dangerous. So, now that I got smart about that stuff. I use this self-tanner and tan with out UV rays. It works!

If anyone has any questions about using this please leave a comment in the box. I will do my best to answer any questions for you.
Continue reading...

Secret Clinical Strength Waterproof Antiperspirant/Deodorant- Rating: ♥♥♥♥♥


I am always on the look out for a really good antiperspirant/deodorant. In this heat the sweat pours. I know gross, but hey if you're not wearing deodorant you need too. lol. So, I have been using this stuff for a month now, and the results are great. I use it exactly how it says on the directions, applying it morning and night. I apply all deodorants this way normally. I never smell stinky and no pit stains. So, I'm happy. I can't remember exactly how much I paid for this at my local Wal-Mart, but I do remember that it was a little more expensive than my trusty old Degree, probably about $5.00 or so. This antiperspirant uses 20% of Aluminum Zirconium Trichlorohydrex Gly to keep you from sweating. It is also waterproof so that helps to keep it on. Give it a try it's good stuff.
Continue reading...

My Summer Must Have Beauty Products


This is a list of items that I use on a regular basis (daily or as directed). The summer months means sweltering heat and unbearable humidity here in south Louisiana. So, I am always looking for products that have incredible  staying power, and protect me from cancer causing UV rays while still delivering great results. Click the titles of each product to see a full review of each one.

Secret Clinical Strength Waterproof Antiperspirant/Deodarant Advanced Solid

Jergens Natural Glow Revitalizing Daily Moisturizer for Medium Skin (gradual self-tanner)

Eucerin Sensitive Skin Everyday Protection Face Lotion SPF 30

Revlon ColorStay Foundation with Soft Flex SPF 6 for Combination/Oily Skin in 330 Natural Tan

MAC Lustre Drops in Pink Rebel

Mark Bronze Pro Bronzing Powder in Bronze

MAC Sweetness Blush, Tippy Blush, or Dollymix Blush
*NARS Desire is also very similar, and so is NYX Hot pink for a cheaper alternative.*

L'oreal De-Crease, or Too Faced Shadow Insurance

Maybelline Lash Stiletto Waterproof Mascara

BTW- You will notice that I do not list any eyeliner in my Summer Must Haves. Well, this is because I try not to use much eyeliner in the daytime during the summer. I normally love to line my waterline with Urban Decay's Eye Pencils, but in the daytime during the summer months it makes more of a mess than it does wonders for my eye look. I opt to use this only for nights out on the town in the summer months (the nights are a tad cooler). Also, I do not list any eyeshadows. This is because I love them all! I mainly use MAC and NYX eyeshadows and I use which ever ones I am in the mood for that day. Eyeshadows are a year round product and they are all my favorites. Seriously, I don't own one I don't like. If I have to be specific as far as summer eyeshadow shades, I do like to bring out the colors this time of the year. Just to add a little fun to my look, but I still do neutral looks as well.

I hope you give some of these products a try and if you have any questions about any of them just leave them in the comment box. I will be happy to answer them.
Continue reading...

MAC Paint Pots Swatches & Reviews


I love these things! I bought Construtivist, Moss Scape, and Rollickin' from my CCO for $11.75 each. The Rubenesque I bought from a lovely Specktrette for about $10. Coral Crepe and Indianwood I bought at MAC for $16.50 each. So, keep your eye out for these at your CCO for a nice discount on them.

I use these Paint Pots as an all over lid color, base, and primer all in one. When I use these as a base I do not use a primer under them. I just blend the heck out of them, and I do not ever experience any creasing. My lids tend to be on the dryer side so that helps to keep the creasing down. Others with oilier lids may want to apply a little Urban Decay Primer Potion, Too Faced Shadow Insurance, or L'oreal's De-Crease for a cheaper alternative. When you use use a Paint Pot as a base under your eyeshadow it brings out the color of your eyeshadow making the shade appear more intense. The PP also gives your eyeshadow something to stick to and helps it last much longer than normally.

I also love to use these as a quick "get my butt out the door" wash of color. Most of the shades I have with the exception of Coral Crepe and Rollickin' have a nice shimmer to them. The ones with shimmer give a gorgeous "made up" look with just a couple swipes of the brush.You can also add to the intensity of your wash of color by building up the PP on the lid. You need to just add more product and blend until you achieve the right intensity for you. Just a word of caution...the more of this product you apply to your lid, the more likely it is to crease. When I use these as a wash of color I always use a separate primer before I apply my Paint Pot.

BTW- For those of you who are wondering. I do prefer MAC's Paint Pots over their Shade Sticks. I find that the Shade Sticks dry out extremely fast.

Enjoy the swatches! If you have any questions just leave them in the comment box. I love to hear from ya'll!


Continue reading...

Thursday, June 3, 2010

Revlon PhotoReady Foundation- Review, Swatch, & Trick


The PhotoReady foundation is formulated to achieve a flawless look to your skin in photographs.  Their formulation uses tiny flecks of shimmer to capture the lighting and deliver a smoothing aspect to the skin. It's great for what it is designed for and gives great results in photos. PhotoReady is a light to medium coverage foundation. I has pretty good staying power indoors lasting about 6 hrs. with one re-swirl (I use my #187 and just re-swirl my foundation) mid-day. This foundation only last me about 3 hrs. when I'm shopping and going from indoors to the outdoors. In this south Louisiana summer humidity after 3 hrs. I must re-swirl this foundation to bring it back to life. Honestly, I've never used a foundation that will stand up all day without any touch ups outdoors in this extremely humid climate. I think it's a lost cause. The best one for the staying power I have found was Estee Lauder's Double Wear, and I can't stand the way it feels so heavy and mask like on my face. Yuck.
Revlon PhotoReady Rating: ♥♥♥

PhotoReady Pic on the face. Coming soon.

Many have compared Revlon PhotoReady to Make Up For Ever's HD Foundation. I would say that it is comparable only in the results seen in photographs. They both achieve a natural looking flawless finish in pictures. In real life, looking at a persons face in front of you, then you can see that the two foundations are totally different. The staying power of both foundations are about the same. The MUFE HD may last about an hour or two longer with no touch ups, than Revlon PhotoReady.

PhotoReady Pic & MUFE HD Pic on the face. Coming soon.

If you pump each of these foundations out in a little dot on your hand side by side you can easily see the difference in each of them. The PhotoReady has a noticeable shimmer in the foundation. Were as the MUFE HD foundation has no noticeable shimmer at all. Blended out the PhotoReady's shimmer is not noticeable on my skin indoors at all, but outdoors there is still some subtle shimmer visible. MUFE HD blended out just leaves a healthy/dewy glow with absolutely no shimmer at all. In my opinion, if you don't mind a little shimmer in the day give the PhotoReady a try. For sure if you are having a fun night out on the town and will be taking lots of pics this will be a great foundation.

For those of us who are not fans of the slight shimmer in the daylight, but still love a healthy dewy glow like the MUFE HD foundation gives, but the price tag on MUFE HD seems a little steep. Give this method a try. I use this as my every single day foundation and it looks amazing in person as well as in pictures.
I mix equal parts of Revlon PhotoReady and Revlon ColorStay foundations. I use my SS197 to swirl and buff my foundation in. I have also used the MAC187 brush to stipple this foundation and this method also achieves very good results. I just prefer the SS197 swirl and buff method because it is faster. Using this foundation mixture cuts down on the shimmer that the PhotoReady has on it's own while still leaving a dewy finish on the face. The Revlon ColorStay brings up your coverage a level and adds to the staying power. I always get at least 2-3 hrs. more out of my foundation this way, depending on the climate. In other words, it gives you all of the great factors of each foundation and combines it into on. Nothing Better!
Revlon PhotoReady & Revlon ColorStay MIXED Foundaiton Rating: ♥♥♥♥♥

Click the images to see the big picture....


Pic of mixture on the face. Coming Soon.
Continue reading...

To The Beach Reviews & Swatches


♥ Marine Life Highlight Powder- OMG! The hype about this product is outrageous! Let me tell you it is not just talk! This stuff is absolutely the most beautiful thing I've ever seen from MAC, both in the pan and on the cheeks. I have no idea why they call this highlight powder, because I don't think even the darkest woman of color could wear this as a highlight, it is blush. A beautiful coral/pink blush with a golden shimmer, at least for the first 3 times I applied it. The golden shimmer is an over-spray and is gone within the first few times you swirl your brush in it. This fact turned a lot of ladies off of this product at first. They were like, over spray...booo! Well, even after I found out that it was truly an over spray I still fancied Marine Life. Being the total blush whore that I am I could see the beauty of this long after the sparkle had faded. It did not let me down. All I can say is thank goodness I got a back up. My MAC store pre-sold all of their Marine Life powders before the release date, and that is saying a whole lot being that most of the LE products can be found here for some time after the release date. I don't think there are very many MAC addicts down here in south Louisiana. This is not the case with Marine Life, it's all gone, trust me I've called every MAC store in Louisiana there's none left. I guess it's best for me though. I think I was going a little crazy wanting a back up for my back up. lol. It's just that good. If you can't get your hands on Marine Life do not pay evilbay prices. I would apply a light dusting of Intenso, pile on some Hipness, and be happy, because you look fabulous! I learned my lesson about paying for hype with cash. I bought Parrot eyeshadow for $30 on evilbay, never again! Rating: ♥♥♥♥♥♥♥♥- off the charts!!

♥ Sweet & Punchy Eyeshadow- I skipped this one even-though it was originally on my list. I brought in my Tempting quad and compared it to Sharp. Way to close from me to get S&P. The only differences was that S&P was slightly more gold than Sharp and of course S&P is a veluxe pearl and Sharp is a satin. Now, if I didn't have Sharp or Rated R (exact dupe) this would be mine. I love golden toned greens. I had a chance to play around with it and it would be a great addition to anyone's collection. Rating: ♥♥♥♥♥

♥ Humid Eyeshadow- I've had my Humid eyeshadow for quite sometime now. I bought it at the CCO several months back. It's a beautiful frosted, deep shade of true green. I use it mostly for the outer V or in the crease. Rating: ♥♥♥♥♥

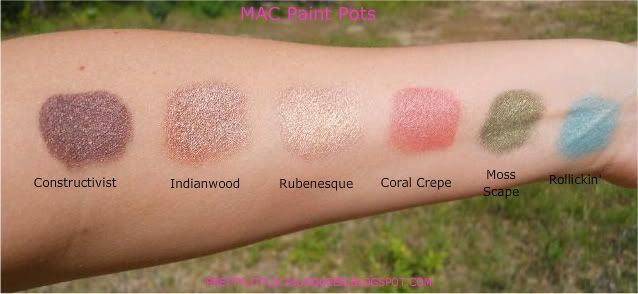
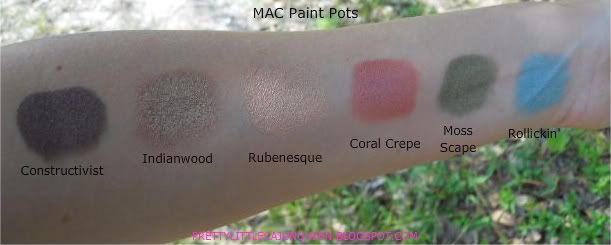
♥ Firecracker Eyeshadow- I've been on a kick for orangy/coral eyeshadows lately and this one was a must have for me. Firecracker is a beautiful coral/orangy/pinkish veluxe pearl shade. I can't wait to pair this one up with my Coral Crepe Paint Pot. Yummm. You'll love it if you're not afraid of a little color. Rating: ♥♥♥♥♥

♥ Sun Rush Lustre Drops- Aww damn, this always happens to me. I get so excited about a product and when I finally get it I'm totally unimpressed. This is sadly the case in Sun Rush. I didn't even swatch this in the store I just knew I was going to love them, because already I have the Pink Rebel Lustre Drops from the Style Warriors collection and I absolutely love them. They give the most gorgeous J. Lo glow ever. I was really hoping that the Sun Rush would do the same but be a bit more of a bronzey glow. Wrong! I think that the Sun Rush ones are just so close to my natural skin tone that they just disappear into my skin. Seriously, it looks like nothing is there. $18.50 for a bottle of nothing. I don't think so. I'll be returning these. :( Maybe if you are fair say NC20 at the darkest, I think these would look nice and show up as a bronzey glow. For me personally this is not the case. Rating: ♥

♥ Opulash Mascara- Since I didn't end up getting the Sweet & Punchy eyeshadow I went ahead and picked up some of the Opulash Mascara. I am a total ZoomLash freek. I wear the zoomlash everyday with a little bit of Maybelline Lash Stiletto WP on  top just to make the zoomlash water resistant. I have PlushLash as well and I really like the formulation, but that dang brush drives me insane, why it is flat on one side. I don't get it??? What the heck is that for? I haven't opened my Opulash yet, but I have high hopes for it. I'll let you know what I think a bit later.

♥ Hipness Blush- Now, lots of girls are saying that the Fafi Hipness is sooo much better than the To The Beach Hipness. They say that the TTB Hipness is so chalky and la la la. Guess what, I think that they both are some what chalky. Yep, and I still love both of them. They both have good color payoff and blend well into the skin. Honestly, I think it maybe a good thing that they are slightly chalkier than some of the other blushes. The chalkiness makes it a little harder to really load this stuff up on your brush with just one swipe. With this vibrant shade that's a good thing, unless you like the "slap ya mama" look. So, in my opinion, To The Beach Hipness is a must have if you want a back up for your Fafi one or if you missed the Fafi's release. I was incredibly lucky and got mine at the CCO. :)
Rating: ♥♥♥♥♥

♥ Here's Karla Sugar's Blog again, for amazing swatches:
To The Beach Part 1
To The Beach Part 2
Continue reading...

Followers


Tiffany L. Prevost Esthetician & Makeup Artist Copyright © 2009 Cosmetic Girl Designed by Ipietoon | In Collaboration with FIFA
Girl Illustration Copyrighted to Dapino Colada