Friday, April 23, 2010

I just wanted to let everyone know that Sigma's SS197 is back instock!!


It's back after being out of stock for months! For those of you who are interested and would like to have it soon, go order now before they run out again. If you are considering it, but not just sure... I will be posting my review soon, so check back with the Pretty Little Cajun Queen for that.

I ordered mine last night along with another of the SS224. The SS197 is a large synthetic flat top kabuki. I'm hoping it will be what I wanted the MAC130 to be. The MAC130 was a total let down because it is so frickin little. I guess the MAC130 would be ok for a cream blush or some detailed foundation work, but I wanted a true foundation brush. You know, a big one, kind of the size of the MAC187. I hope it is. Well, they should be here in a few days and I'll let you know how if I love it or hate it.
Continue reading...

Tuesday, April 20, 2010

Rose Facial Mist (MAC Fix + Rose) Review & Recipe: Rating: ♥♥♥♥♥


Rose Facial Mist (MAC Fix + Rose): For those of us who were lucky enough to get to try MAC's Fix + Rose and are soooo sad that we have ran out, here's an alternative. Thayers Rose Petal Witch Hazel & Thayers Alcohol Free Cucumber Witch Hazel with Aloe Vera. The ingrediants are so simular. The only two main ingrediants that the Fix + Rose has that the Thayers mixture doesn't have is Green Tea & Matricaria/Camomile Extract. I was a little put off by this, knowing how great these ingrediants can be for the skin. But, after doing some detailed research I found out that Aloe Vera contains just about the same minerals, vitamins, etc. as the missing ingrediants, and preforms the same job as they do. Actually, the Aloe Vera is even better and has more skin benifits than Green Tea and Camomile combined. Amazing. This can be used before you apply your makeup to give a moisturized base, as a setting mist after your foundation is applied, or you can drop a bottle in the frig for a refreshing recharge in the hot summer months.

Now, lets talk price. The regular price of MAC's Rose Fix + was $19.50 USD. That means that this stuff is $5.74 per ounce. I was lucky enough to find mine at the CCO for $13.75 USD, still $4.04 per ounce.
The Thayers Rose Petal Witch Hazel is $9.95 for a 12 oz. bottle on the Thayers web-site, which brings it to $0.82 per oz. The Thayers Alcohol Free Cucumber Witch Hazel with Aloe Vera is the same price for the same amount. You can find these at you local GNC for a little cheaper too, but just incase you can't find it this is what the maximum price would be. You can pick up a 12 oz. bottle of destiled water for about $3 just about anywhere. The destiled water is $0.25 per ounce. So, since we are using 1 oz. of each product in each 3 ounce bottle of mist, the price per bottle is around $1.89 per 3 ounce bottle. Now that's what I'm talking about! You will have enough product to make 12- 3 oz. bottles of mist for $23.00. That's damn near the same price as one bottle of MAC's Fix + Rose.

Do you love it? Give it a try. Please comment and let me know what you think about it.

Rose Facial Mist Recipe:
1 empty 3 oz. spray bottle (I'm using my empty Fix + Rose bottle)
1 oz. Thayers Rose Petal Witch Hazel
1 oz. Thayers Alcohol Free Cucumber Witch Hazel
1oz. Distiled Water

Directions: Combine all your liquids in the empty 3 oz. bottle shake and viola! Rose Facial Mist!
Continue reading...

Monday, April 19, 2010

Rose and Cucumber Witch Hazel, Asprin Toner- Rating: ♥♥♥♥♥


Rose and Cucumber Witch Hazel, Asprin Toner Recipe:
1 empty 2.5 bottle- I used an old bottle of Neutrogena Healthy Skin Face Lotion, which has a pump.
1 1/4 oz. Thayers Alcohol Free Rose Petal Witch Hazel
1 1/4 oz. Thayers Alcohol Free Cucumber Witch Hazel with Organic Aloe Vera
5 325 mg. uncoated Aspirin (2- 325 mg. aspirin per ounce of Witch Hazel)
1/2 tsp. warm water
1 disposable, paper bathroom cup

In the disposable bathroom cup drop in your 5 aspirin and your warm water. Mix the aspirin around a bit with your finger or clean spoon. To the aspirin paste add about 1/2 of either of the witch hazel blends. You just want enough liquid so that it is easy to pour. Bend your paper cup to form a sort of spout and carefully pour the mixture into your empty bottle. Add the rest of the witch hazel blends and shake it up. All done!

When you use the toner just pump a bit on to your fingers and dab on your face. If you would like you can then come back and wipe your face with a cotton pad. Applying the toner directly to the cotton pad wastes your product, because it is absorbing in the pad and not going on your face.
Continue reading...

Tiffany's Daily Skin Regimen- How To


I have hormonal acne prone skin, that tends to be mostly on the slightly dry side, and is sensitive to any changes I make in skincare or foundation. I have to be very careful with my routine, any change in my products will make my skin freak out causing acne, dryness, or oilyness on my nose and/or in between my eye brows. I'm also in my late 20's, so treatment and prevention go hand in hand as far as skincare is concerned. I treat my acne and skin discolorations. I have a few slight discolored spots on my cheeks from sun exposure in my late teen years, trying to be a bronzed goddess. Very dumb of me, but your clueless about these things when your young. I try to prevent acne, more discoloration, wrinkles, and dryness. I am a total drugstore gal when it comes to skincare. There are great products you can find for a good price at the drugstore instead of spending big bucks on department store products that work just the same. You just have to know what to get. I have been using this skin regimen for the past 9 months with great success and a soft, clear face. I know that we all have different skin types, but even if your skin type is totally different than mine this regimen could work for you by just adjusting a bit to fit what your skin needs. If you're oily slack up on some of the moisturizers I use or don't use any at all. You may have to play around with it a bit to get the perfect regimen for you. For me, this is the best. To see my full review for each of these products just click the names. So here we go...

Every Morning: (Mon.-Sun. am.)
Step 1: AcneFree Oil-Free Purifying Cleanser with 2.5% Benzoyl Peroxide (Acne Treatment Cleanser)
Step 2: AcneFree Renewing Toner Skin Balancing Formula (Acne Treatment/Toner) or my homemade Rose Water Witch Hazle & Aspirin Toner

Step 3: Eucerin Sensitive Skin Everday Protection Face Lotion SPF 30 (SPF Moisturizer)

I start off cleansing my face with the AcneFree Cleanser using my face brush in a circular motion. I rinse the cleanser off, pat dry. Then, I apply the AcneFree Toner to my fingers and  pat it all over my face, kind of like a guy uses aftershave. After, I fallow by applying the Eucerin SPF moisturizer by dotting tiny dots all over my face and gently rubbing in. I allow that to fully soak in. Make sure you rub this moisturizer in very well because it contains a sunscreen and it will leave a yucky white cast on your face. Then I apply my foundation.

Every Night: (Mon.-Sun. pm.)
Step 1: Johnson & Johnson's Baby Oil Gel (Eye Makeup Remover)
Step 2: Almay Oil-Free Makeup Remover Toilettes (Makeup Remover)
Step 3: AcneFree Oil-Free Purifying Cleanser with 2.5% Benzoyl Peroxide(Acne Treatment Cleanser) (skip Thurs. pm)
Step 4: AcneFree Repair Lotion Time Released Benzoyl Peroxide (Cream Acne Treatment)
Step 5: Neutrogena Ageless Intensives Tone Correcting Serum Night (Discoloration Treatment)
Step 6: Eucerin Q10 Anti-Wrinkle Sensitive Skin Creme (Moisturizer/ Wrinkle Prevention)

First, like everyone else I stark by taking off my makeup. I apply a fragrance free baby oil gel to my eye lids and rub it in a bit to loosen my eyeliner and mascara. Then, I use the Almay Toilette and  finish removing the residue on my eyes and the makeup on my face. After that, I cleanse my face with the AcneFree just like I do in the morning. Then, I fallow by applying a thin layer of the AcneFree Repair Lotion to my forehead and my temples. I use my hands to apply the thin layer and I do not rub it in. I just let it soak in on its own. Next, I apply the Neutrogena Tone Correcting Serum to my undereye area and along my cheek bones. I don't rub this in much either. I let it do it's own thing. After everything has  soaked in a bit I apply the Eucerin Q10 by dotting it on the bottom 1/3 of my face, starting with my nose down to my chin and message it in until all of it has absorbed in my skin.

Every Other Night: (Mon., Wed., Fri. pm)
Step 3: Neutrogena Oil-Free Acne Stress Control Power Clear Scrub
I add the Neutrogena Oil-Free Scrub to the beginning of my nightly regimen, after I have taken off my makeup. Then, I just fallow my same nightly routine as I normally would. For the scrub, I start with a damp face then I apply the scrub and message it in circular motions with my fingers just to get it evened out all over my face. Then, I come back with my face brush and really give it a good scrubbing.

Once a Week at Night: (Thursday pm.)
Step 3: Homemade Honey and Asprin Mask (click here for my Asprin Mask Recipes)
Once a week I use my homemade Honey and Asprin mask instead of the AcneFree cleanser. I use it on a night that I will not be using the Neutrogena Oil-Free Scrub. This mask is great and helps along with the rest of the AcneFree System to keep my skin blemish free.
I know this is the longest freaking post ever, but I hope that it is full of useful info that you can use to help keep you face looking like you are 22 yrs. old or at the least out of the acne stage. If you have any questions or would like to share how you keep your skin as clean as a whistle please comment. I love to hear from you. :)
Continue reading...

Asprin Mask Recipes For All Types of Skin- How To


Basic Aspirin Mask Recipe:
6 uncoated aspirin
1/2 Tbs. warm water
1 1/2 Tbs. Facial Product

Directions: Place 6 aspirin in a paper plate or plastic tray. Drop warm water over the aspirin to dissolve. Mix the aspirin around a bit to form a gritty paste. You will then mix in the paste with the appropriate facial product from the list below according to what skin type needs. After your mask is all mixed up you will apply it with you finger in a even layer on your face. The mask doesn't really need to be thick. It just needs to be evenly distributed all over the face. Then, let your mask dry for at least 10 mins. You can increase the time depending on your skin type. Very Dry for 10 min., Dry for 15 min., Oily and Very Oily 20 mins. I don't recommend leaving it on for more than 20 minutes, because it can easily be to drying. After your mask has dried dampen your finger tips and lightly scrub in your mask. Do not remove the mask, we're just trying to get off the loose particles right now. When the loose particles are all gone, we will then wet our finger tips again and scrub more vigorously. Wet your finger tips again and scrub. Repeat until all the mask is gone. Just a * Tip: For this step I like to use my facial brush to scrub with. I scrub and run the brush under the water and repeat until the mask is gone. After, I splash my face with lukewarm water just to make sure no residue is left behind. I always fallow the mask with a moisturizer suitable for your skin type, unless your skin is extremely oily.

Large Pores:
1 1/2 Tbs. Queen Helen Mint Julip Mask

Aging Skin:
1 1/2 Tbs. Queen Helen Mud Mask

Sensitive Skin:
1 1/2 Tbs. Aloe Vera Gel

Dry Skin:
1 1/2 Tbs. Honey or Plain Yogurt

Oily Skin:
1 1/2 Tbs. Cleanser for Oily Skin

Very Oily Skin:
1 1/2 Tbs. Cleanser for Oily Skin
1 tsp. Lemon Juice

Very Dry Skin:
1 1/2 Tbs. Honey or Plain Yogurt
1 tsp. Jojoba Oil or Vitamin E Oil (you can squeeze out about 3 gel capsules)

* Tip: Jojoba Oil or Vitamin E Oil (1 tsp.) can be added to any of the other recipes for added moisture.
* Tip: Lemon Juice (1 tsp.) can be added to any of the other recipes to zap oil.

Zap That Zit: Night Time Spot Treatment:
1 uncoated aspirin
2 drops of warm water
1 pea size drop of acne spot treatment

Directions: Place the aspirin in your clean palm, add the drops of water on top of aspirin, dissolve. Add the acne spot treatment of your choice, and mix with your finger a bit. Apply the mixture directly on your blemish. Go to sleep and let it work it's magic. In the morning the zit has been zapped. If you catch the pimple as soon as you feel it start to come out, it will be completely gone. For a serious monster zit, you may have to use this for 2 or 3 nights, but it will be gone after that.

* Tip: I like to use an acne spot treatment that contains benzoyl peroxide instead of the salicylic acid. This gives that zit a one, two punch. I mix the aspirin with either the AcneFree Repair Lotion or a little Clean & Clear PersaGel 10. They both work great.
Aspirin = salicylic acid
      +
AcneFree Repair Lotion or Clean & Clear PersaGel 10 = Benzoyl Peroxide
      =
Zap That Zit

I know you will love your clear skin!
Continue reading...

Asprin Masks- Review- Rating: ♥♥♥♥♥


The aspirin mask is a life saver for many people including myself. It's a tried and true home remedy for acne, enlarged pores, and redness. Aspirin contains a derivative of salicylic acid and an anti-inflammatory which work wonders for treating these skin problems. I must say that the aspirin masks may not be for everyone. The salicylic acid found in the 6 aspirin that are recommended in the mask recipes are a much more concentrated level than you find in most over the counter acne treatments. Therefore, the aspirin mask can be extremely harsh and drying on very dry, sensitive, or rosacea skin types. I'm not saying that people with these skin types should not try the mask. But, I am saying that you may need to adjust the amount of aspirin you use to accommodate your skins reaction to it. You may also need to adjust the amount of time you leave the mask on for. If your skin gets dry and flaky, I would decrease the aspirin by one pill and decrease the time by 5 minutes. Then, try again until you get the results you desire. I also recommend fallowing the aspirin mask with a moisturizer suitable for your skin. I have skin that is on the dryish side so I always fallow the mask with a nice coat of Eucerin Q10 Anti-Wrinkle Creme. I have used various recipes of this mask approximately once a week for the past 5 months and my skin looks fantastic. You can use the mask more often than I do especially if you acne is more on the severe side, but I wouldn't use it more that 3 times a week. I think it would be way to drying if you use it more than that.

Bottom Line: It's great stuff just use it carefully and experiment with it until you get it right for you.
Aspirin Mask Recipes For All Types of Skin- How To
Continue reading...

Sunday, April 18, 2010

Acne Free Treatment System Benzoyl Peroxide 2.5%- Rating: ♥♥♥♥♥


This acne 3 step treatment system has been said to be better than ProActive. I can't say whether or not I agree because I never bought the ProActive line. The only reason why is because the AcneFree System works great for me. I feel like why should I buy a more expensive product when the cheaper one works for me? You can purchase this stuff at just about anywhere, CVS, Walgreens ect., Wal-Mart, Target, and SAM's carries it too. It costs about $20 USD, but I bought some at SAM's for $17 USD a while back.

I fall in the 25-30 yrs. age category and it wasn't until I reached this age that I ever had any problems with acne. All through my teen years when we're supposed to get acne I never did. I mean, I would get the little "warning acne" letting me know that it was almost "that time of the month". Even then, I never had a true break out, always just one or two. Back then I would just spot treat the blemish and be on my way. Ever since I turned 25 it has been an on going battle to keep my face clear. I guess my hormones fluctuated from having my 2 babies and the consequences is "hormonal acne". Darn it! I wouldn't call my current acne breakouts either. It's more like "acne prone"...I get these tiny bumps on my forehead and by my temples. I think that these are probably caused by my sweat and the natural oils from my hair (my hair is not oily) clogging my pores. Occasionally, I get one on my chin at the corner of my mouth. I used Aveeno Clear Complexion Foaming Cleanser (salicylic acid) for a long time and it worked pretty good. But, in the summer of '09 my skin went crazy and it seemed like nothing I used was working. I was still getting the bumps on my forehead, and my Avenno wasn't doing a thing to get rid of them or prevent them. I tried spreading the Clean & Clear spot treatment all over my forehead and going to bed to let it soak in. Nothing...

I went on the hunt for something that would really help. I had seen the AcneFree System at my Wal-Mart and wondered what it was all about. I turned to my trusted MakeupAlly for reviews, it sounded great to me, and I purchased it the next time I went into town. I got the exact set that is pictured in the MUA reviews. The results were great for me, but you must give it at least two weeks to really start working, at least that was the case for me.

 I use the cleanser in the morning and at night. I remove my makeup and smooth a small amount all over my damp face with clean fingers. I prefer to use my fingers because if you use a cotton pad like the bottle suggest, the product soaks in the cotton pad and you don't get the full strength on your face. Then, I scrub the cleanser in using circular motions with my hand held face brush ($2 from Sally's). Next, I rise and fallow with the AcneFree Renewing Toner.  Again, I don't use a cotton pad for this either. I pour a little at a time into my hand and apply it to my face like a guy applies an aftershave. I know it sounds weird, but it works, and you're not wasting your product. I only use the toner in the morning, because I found it a little to drying to use both am and pm. But, that's just me. If your skin is on the oily side you might want to use it morning and night. Last, comes the AcneFree Repair Lotion. I use my fingers for this one too, and only at night. I don't like using it in the morning because of the heaviness of the moisturizer. It seems to make my skin to oily for day. I tried using it day and night, but when I applied my foundation after the moisturizer dried, about 2 hrs. later my face looked yucky. My skin looked oily and my foundation looked really caky and flaky. So I just stopped using the Repair Lotion in the morning. When I first started using the system it took about 1 week for my skin to stop purging. Within this time my skin was pretty broken-out. I had several blemishes. The beginning of the second week they started clearing up. By the third week I was all clear and have been ever since. So, as far as the AcneFree System Benzoyl Peroxide 2.5% goes, I love it!

I do have a skin routine that I fallow like religion so that my skin always looks it's best. I will tell you more about all of that stuff in my Daily Skin Regimen post. I will be posting that this week, so keep an eye out for more good info.
Continue reading...

Thursday, April 15, 2010

NYX Runway Collection- Versus 10 Color Palette: Rating ♥♥♥♥1/2


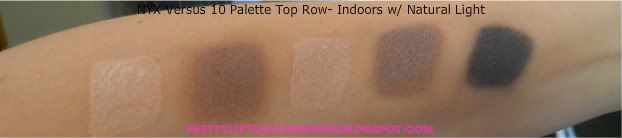
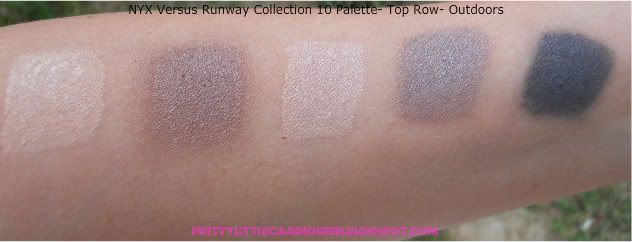
Top Row: This is a great palette to have in your collection. I love these to travel with, compact and no fuss. The top row is full of creamy, taupey brown tones with a shimmery shade of black. The first shade is a creamy beige tone that has a finish/texture that is simular to the MAC matte2 shades. The second, is a mid-tone camel brown with a satin finish. Third, my favorite, we have a frosty shade of light creamy brown tinged taupe. Fourth, we have a frosty grey/brown taupe with a buttery soft finish that is comparable to a veluxe pearl, and is very simular to MAC's Smoke & Diamonds. Last, is the dark charcoal black with silver pearl shimmer. The texture of this shade is slighly more chalky than the others, but is still nice for the price.

MAC DUPES (L to R): Shade 1: Blanc Type- Shade 2: Era- Shade 3: Dazzlelight- Shade 4: Smoke & Diamonds- Shade 5: Black Tied with a slightly chalky texture.

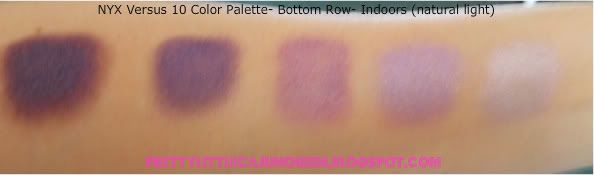
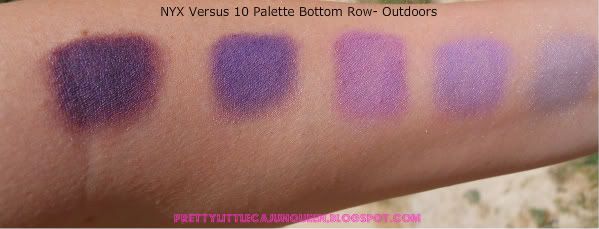
Bottom Row: On the bottom row we have some softer shades of purple with a slight pink base.The first shade is a deep plumed purple with a soft texture and a satin finish. Second, is what I would call a medium toned spring purple with a velvet finish. This shade is slightly chalkier in texture than most of the shades. Third, is a blue based pink with pink pearl that has a very soft texture and a veluxe finish. Forth, is a pale lilic with a velvet finish and a slightly chalky texture. Last is a creamy/white shade with a frost finish and a buttery soft texture.


MAC DUPES (L to R): Shade 1: Fig. 1 with a soft satin finish- Shade 2: Purple Haze with a velvet finish and chalky texture- Shade 3: Swish with a soft veluxe finish- Shade 4: ??? pale chalkish lilic- Shade 5: Nylon with a finish and texture that screams veluxe pearl.
Continue reading...

China Glaze- Purple Panic (neon) Rating: ♥♥♥


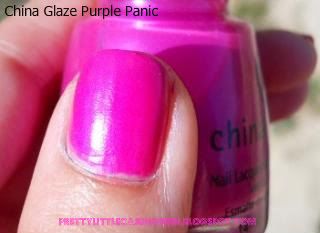
Let's start with the things I love about this polish....The Color!! It is the most vivid, hot fuchsia pink with a slight reflect of a purple undertone. Perfect for a hot, flirty summer nail. I just wish the formula for this polish was as knock-out as the shade is. Aw man, this stuff was a pain in the butt to get right. Purple Panic is a neon shade and neon shades are notorious for having a dull/flat/matte looking finish. This one is not an exception to the rule. That is the easy part to deal with though. You just need to add your most glossy top coat to the top and vahla, just that easy. Hum I wish, this polish also had some major drying issues. The first time I applied this polish I applied 1 medium coat and 3 min. later fallowed up with a 2nd medium coat, 3 minutes after the 2nd coat I added my Sally Hansen Insta-Dry Top coat. I ended up with a gloppy mess that never dried. So, I started over...1 very thin coat of polish, 5 minutes to dry, 2nd thin coat of polish, 5 min. to dry, 3rd thin coat of polish, 5 min. to dry, then Sally Hansen Insta-Dry Top Coat. It was quite time consuming. I must say that the final result was gorgeous. A beautiful mani with a brush stroke no where insight. So, yeah I'll be keeping it and using it again this summer, but I will have to use this one when I have the time to spend on the application. I will also keep my neon polish collection down to Purple Panic and Turn Up The Turquoise (another CG neon) and that is it. These two shades were just to pretty to pass up and since I only have two I should be able to find the time to apply them.
Continue reading...

Wednesday, April 14, 2010

My Summer Mani and Pedi: China Glaze: Rating: ♥♥♥♥♥


I am a sucker for a beautiful bright mani/pedi for the spring and summer months. For the most amazing color selection I turn to China Glaze. It doesn't matter what your favorite shade may be, they are bound to have several that you fall in love with. I like pretty much any color as long as it suits me. I do tend to lean towards blues, purples, pinks, corals, and reds, but I'm easily swayed in any color direction. China Glaze finishes range from a sheer, cream, shimmer, and glitter. I tend to stick with either a shimmer or a cream finish. I sometimes will do a sheer on my mani, but never on my pedi. I never go for the glitters. I'm over 21 so no glitter for me. I know is probably just me. I wore glitter nail polish before I could wear makeup on my face, so it reminds me of a young look. Though, I have seen ladies my age wear it and pull it off. I just don't think I could.

China Glaze's (CG's) formula is usually great (you always have a few bad apples) and gives results that last in between 3-5 days, depending on the top coat I use. Seche Vite gives me the most lasting results. I would compare the formula and the staying power to Essie's polishes. The only formula I like better than Essie and China Glaze is OPI, we're talking 5-7 day long mani with OPI. I must say that regardless of which formula I use my manis tend to be slightly more short lived than most ladies would be. I put my mani through the ringer, with taking care of my three ^sweet♥'s^ (dh included), cleaning, cooking, and digging in the flower beds my mani takes some extreme abuse. So most lady's manis will stay going strong long after I have made a new color selection. Honestly, I have a routine of changing my polishes on Monday and Thursday nights. I do it this way so that I will have a new shade for the weekdays and another shade for the weekends. I know, pretty silly, but I love it!

I will try my best to post swatches of both of my weekly manis for you this summer. So, keep an eye out for that. It won't be hard to miss as bright as they all are- lol ; ) I hope you love it!

Continue reading...

Wednesday, March 17, 2010

Sigma Essential Brush Kit & Professional Premium Brush Kit- Review: Updated 5/10/10


Sigma Essential Brush Kit

SS150- ♥♥♥♥♥- I love this brush. It is super soft and has a long handle so that you can control your application better. I don't have the MAC150, so I have nothing to compare the Sigma one to. Never the less, this is a must have for setting powder.
* Update 5/10/10: I hear that some people have issues of bleeding and shedding with this brush. My brush has been washed about 5 times now. I have not experienced any of these things with my SS150. When I first received the sets all of the brushes had a stinky plastic/chemical smell. One wash took care of that issue and they all smell fine.

SS187- ♥♥♥- I was really worried about this brush being horrible before I ordered my set. Well, it's not horrible, but it's not amazing either. When I washed it there was barely any bleeding like I was afraid there would be. It's more dense than the MAC187, which I like. The only thing is that I get some slight shedding when I use it...like 5 to 7 hairs. I know that's not a lot and is definitely not a good reason to not buy the brush, but I am a freak about shedding. There is nothing I hate more than to have to pick hairs off my face after I'm done with my foundation. I rather use a dang sponge and that's horrible. I am hoping that the more I use it that the hairs will stop falling out, but my patients are getting thin.
* Update: 5/10/10 ♥♥♥♥: The hairs have finally stopped shedding. No bleeding either.

SS194- ♥♥♥♥♥- I don't use this brush that often for concealer, but when I did it worked just fine. I usually use the SS192 to blot out my concealer under my eye. If you like the smaller size though, you will like this one. Although, I don't really use this brush for concealer. I do love it to blend out my eye primer. It's smaller size and pointy-ish end gives you more control, so the primer goes right where you want it to go. Especially, if you are going to prime your lower lash line area. It's a nice brush to have no matter what you use it for.
* Update 5/10/10: I use this brush to dot on my foundation in sections all over my face before I use my SS197. It is also great for doting concealer on any blemishes. I prefer the SS195 for applying eye primer and base.

SS190- ♥- Never use this brush or the MAC190 to apply your foundation, they're both horrible! Streak City! I have never liked this brush. The only useful thing I can figure out to do with this thing is to apply a tinted moisturizer or a face mask. Since the tinted moisturizer is thinner than foundation it doesn't streak it up.
Update 5/10/10: I gave this brush away.

SS168- ♥♥♥♥♥- This brush quickly became my HG blush/contour brush. I have very high bone structure, and this makes applying my blush a quick and easy task. It pretty much blends it as you go. So, no streaks or blotches. I've had no shedding at all from this brush.
* Update 5/10/10: I am looking to buy another one from some where. I'll let you know if I find them individually for sale.
* Update 5/11/10: ACW   has them for sale individually, plus some other good ones. Check it out.

SS275- ♥♥♥- This thing is huge! I don't have a MAC275 to say if it is bigger or whatever, but I do have the MAC272 and it is WAY bigger than it. I really don't have a good use for this one because of it's size, except for maybe a highlight brush??, and I already have a brush I like for that. What do you do with it? It's really a nice brush with the softness and angle and all. I'm just clueless about what to use it for. It's way to big for me to use on the lid. Sigma suggest to use it for application of color in the inner corner. I don't think so. I don't have eyes as big as saucers, and don't know anyone who does. This would be a  mess, the color would go every where. Highlight, yes. Crease, maybe. Inner Corners, oh no no no. Outer Corners, Definitely not.
* Update 5/10/10: I use this brush a lot for highlighting the brow. Still not much more to do with it than just highlighting.

SS252- ♥♥♥♥♥- I love this one just as much as the MAC252. I would also say that the MAC252 and the SS252 are two totally different brushes. I love the SS252 for the oval shape and narrower size. Amazing. You will love it. It fits the lid perfectly. It's great for sweeping your color across the lid. The MAC252 is flatter on the tip and is great in it's own way. I love it for pressing in the color on the lid, like foiling pigments and highlighting. In this case I would say get both.
* Update 5/10/10: I'm still in love with this one, and I find myself reaching for it more than my MAC252, SS239, and MAC239. Must have. I would like to get another one.

SS239- ♥♥♥♥
* Update 5/10/10: Yes, the MAC239 is flatter and comes to more of a point at the end  than the SS239. They are both great brushes. I do prefer the MAC239 over the SS239 only because of the precision on the end of the brush. But, if you are OCD like I am about keeping your white hair brushes looking new and hate it when your eyeshadows stain your beautiful white hairs (MAC239) the SS239 is a great alternative that won't stain.This is another one I would say you need both brushes. Besides you always need more than one placement brush for eyeshadow.

SS224- ♥♥♥♥♥- The queen of blending brushes. This brush has changed my over blended eye looks forever. Love, Love, Love. I had a smaller version of this brush by Coastal Scents. The Coastal Scents one was a lot more dense and shorter than this one. Little did I know that it's denseness was the only reason why all of my eye looks were coming out looking over blended. Just goes to show you good tools are a must, and this one is wonderful. Lots of girls say that if you have the 217 blender that this one is not needed. Bull Shit. I had a MAC217 before I ever got this brush and still my eye looks were coming out over blended. Sometimes you just need a brush of this shape and most importantly this softness to get the best results.
* Update: I bought a second SS224. My love for this brush is unchanged.

SS219- ♥♥- Ehhh, well I'm not impressed. IMO, this is the worst brush of both sets. Don't get me wrong you can use the brush for placing the shadow on the lower lash line and on the inner tear duct just like with the MAC219. It's just that the SS219 is so much fatter and the tip is not cut nearly as precise as the MAC219. After several uses the roundness on the tip gets even worse. I gave my SS219 a much needed hair cut with a pair of scissors and now it's just fine. I think it is ridiculous that I had to do this, but it did work. This brush is a miss for Sigma and really needs to be redesigned. MAC wins this one hands down. Sell your Sigma one that you get in this set on e-bay, save a little more money to go with it, and buy the MAC219.

SS266-♥♥♥♥♥- Oh yes! This brush is exactly what you need in an angled eyeliner brush. It is small and supper thin. I'm thinking more like the MAC208. It is great to do your brows with because of it's size. It's also nice to get than thin line on the upper lash line and makes the winged look a breeze. I would love to have a few more of this one.

SS209- ♥♥♥♥♥- When I first saw this brush I was like damn it's fat. After I used it I realized that this is exactly what I want when I use a regular pencil eyeliner. I love to use a pencil eyeliner b/c it just seems like I have more control over the pencil ones. The best thing is that this brush is always pointed at the end and never goes flat like a regular pencil liner does, no sharpening needed, ever. Just how you use your pencil eyeliner is how you use this brush. You just have to dip it in the color or you can rub the end of the brush on the pencil eyeliner to pick up the color. Looks great every time.


Sigma Professional Premium Brush Kit

SS134- ♥♥♥♥♥- I didn't think that a brush could get any softer than the MAC134, but Sigma proved me wrong with this one. The SS134 is super soft. You just want to rub it on your face. I love to use this brush for any powder application on the face. I even use it some times to apply a more sheer toned blush or MSF, such as Light Flush or Refined.

SS138- ♥♥♥♥- The quality of this brush is great. I just think it was dumb of Sigma to include this one in the set when they have already included the SS165. I think you only really need one brush of this style and I prefer the MAC165, because it is smaller and more precisely cut. I would have much rather gotten the 109 or 116 (which they don't make, but need to). So, I guess if you like the MAC138 you will probably like this one. Especially since the MAC138 is $52USD and the SS138 is part of the set.
* Update 5/10/10: I still say pick one, the 165 or 138, you don't need both. The thing that is hanging me up is MAC vs. Sigma. I know that the Sigma brush is not as precisely cut as the MAC138, but I've been using the SS138 without any problems. I use it to dust my setting powder on my T-zone and I have used it a couple of times to swirl my blush on the apples of my cheeks. It works just fine. So, if you like the MAC138, I would say that the SS138 would be a good alternative. I find that I use it more than I thought I would and have given my MAC165 a little vacation. One thing is for sure...I have a MAC165 backup that I will be selling. There is no need for me to have a backup of the MAC165 when I already have one, the SS165 and the SS138.

SS131- ♥♥♥♥♥- This duo fiber brush is the best one of both sets. When I washed this one I got no bleeding at all. I'm also very happy that this one doesn't shed at all. I was going to purchase this brush from MAC and I messed around and didn't get it. I'm so happy I did. I didn't have to pay MAC's ridiculous price for it, and it works great. I use this brush to apply blushes that are very pigmented and to apply my beloved MSF.

SS129- ♥♥♥♥♥- Nice and soft. I like to use this one to apply my blush to the apples of my cheeks. It's small enough that the blush goes right were you put it. You know more of a precise placement.

SS165- ♥♥♥♥♥- This brush is one of my favorite face brushes. I use this brush every single day. What don't I use this brush for is the question. I always use it to apply my accentuate powder under my eyes to kind of "set" my concealer. I use it to apply my highlight shade to the top of my cheek bone and  use it to contour with. I have also used this brush to apply my blush precisely on the apples of my cheeks. I use it in a swirling motion for that and it works great.

SS192- ♥♥♥♥♥- Yep, I like it. I use this brush to lightly dab in my under eye concealer. The synthetic bristles don't really soak up to much product so it all stays where you put it. The shape fits the under eye area perfectly making quick work of concealing darkness under the eye.

SS227- ♥♥♥- Dang, is this thing huge. There is no way in hell you are going to be able to use this on the lid area, what a freakin' mess that would be. Really, I don't think this would be good as a brow highlight either. It's just to big. This thing is supposed to be an eye brush, but I don't see how the hell your supposed to use it for the eyes. However, I did find a really good use for it...I always apply a loose powder under my eye before I apply my eyeshadow pigments, so the powder will catch any fallout. This brush is great to apply that powder with. It's small enough for you to be able to put the powder right where you want it to go. The brush is stiff enough that when you're ready to take the powder off you can just use flicking motions under the eye and remove the powder.
Update 5/10/10: Figured out one more good use for it. I sometime go out of the lines when I do the outer V on my eye. I use this to clean up the eyeshadow and create the perfect shape on the outer V. So, a handy brush? Yes. A must have brush? Nope.

SS217- ♥♥♥♥♥- Just as good as the MAC217. It's slightly less dense than the MAC217, but not enough to make a difference in your application. I get no shedding from it. This is truly the best of all the multi purpose brushes. I use this to blend out my paint pots, blend any harsh lines on lid, crease application, and to drag out the shadow on the outer corner for a cat-eye look.
* Update 5/10/10: I will be looking for another one of these.

SS222- ♥♥♥♥- Shapelier sister of the 224. This is a good brush if you are looking to apply color it in the crease and just a little on the brow bone (smoke out the crease shade), because it kind of blends as you go. You can also use this as a more precise blender on the outer corner. I like it a lot, but as far as it being a must have in the collection, I would say no. There are already brushes in the collection that do the same thing. I would have rather gotten a different brush, such as the 272 or even a 242.
* Update: I could see where I would love this brush, but the SS222 falls short of my first judgement. I really think this would be amazing to kind of swirl your e/s on the outer V for a fab smokey eye. Again, the down fall of this brush comes to the precision of the tip of the brush. It does an ok job, but could be better. Definitely not as crappy as the SS219.

SS195- ♥♥♥♥♥- I love to use this brush to apply/blend out my paint pots, jumbo eye pencils, and eye primers. It's slightly larger than the SS194 and is angle cut on either side giving you a precise point on top. The way this brush is cut makes it much easier to apply your eyeshadow base/primer very close to the lash line which is great. This brush can also be used for concealer, but I just like it for the lid. Must have? Yes. I need of a second? Nope.

SS226- ♥♥♥- The MAC226 is the only MAC brush I have ever paid full price for. I usually get my MAC brushes from the CCO or from a lovely Specktrette. I just can't see paying full price for them. Weeell, I definitely don't regret paying full price for this one. The SS226 is good and does it's job well, but the MAC one is just better. The SS226 is not cut quite as precise (sharp) at the tip. I did a comparison review for this one already so take a look at the pics there to see what I mean. The SS226 is a good brush to have and no you don't need both of them. Since the MAC226 was a Limited Edition brush the asking price for it it ridiculous now. So, please don't pay the outrageous price for this brush on e-bay or anywhere else. The Sigma one will do a good job. I just prefer the MAC226.

SS212- ♥♥♥♥♥- This is the key to tight lining your upper waterline. Even my shaky hands can do it with this brush.

SS214- ♥♥♥♥- It's a good smudger, but seems a tad scratchy to me.

SS210- ♥♥♥♥♥- Everyone needs this brush or a brush like this...can we say "winged eyeliner". This is a must have for a successful winged eyeliner look. I was having so much trouble perfecting mine with just the MAC266, it is just to big to do a detailed wing look. Now, it's all good, the color goes exactly where you put it. I don't have a MAC210 to compare this one to, but this one is great.
* Update: Oooow Laa La, Double Winged eyeliner...even better.

SS316- ♥♥♥♥♥- It does the job and is great to carry in your purse, because it's all covered up. I like it. What more can I say.

♥♥♥♥- Overall, I think that both sets are definitely worth the price you pay. Although, a few of the brushes are not as precisely cut as they should be and some are way to big to be as useful as I would like them to be. I do wish that Sigma would have included a SS109, SS116, SS242, and SS272, but since I don't run the company I guess you just get what you get and you don't throw a fit. I do think that these are great sets and I am looking forward to buying more of the Sigma brushes that I think are winners. However, since I already have both sets I will be looking to purchase individual brushes from Sigma or who ever else has them for sale individually. Love it!!

** 5/11/10  A note to Sigma! lol **  I'm not sure who cuts your brushes such as the SS219, SS222, SS165, SS138, but you need to fire them. The SS219 is absolutely horrible. Also, check this site out...ACW they are stealing your revenue because they are smart enough to break up your brush sets and sell them individually for a little more than they would each cost in the set. Take a hint from them and make money on your own products instead of letting others take your business. Frankly, I like your company and customer service much better. For now, I am off to make my order for the individual SS168, SS217, SS266, and SS252 with ACW. Even though, I think that they are highway robbers when it comes to the MAC products they sell. They have what I want when it comes to Sigma individual brushes and the price is not bad. So, I'll be putting it in my cart and checking them out.
Continue reading...

Tuesday, March 16, 2010

Products that I always turn to... HG.


I will try not to write to many of these type of posts, where I just blab about whatever, but I really want everyone to know about this stuff. These are the things that no matter what kind of new and improved junk I pick up and try, I always go back to these products. You know tried and true...HG ; )

Cleansing: Acne Free System (am & pm)

Eye Makeup Remover: Unscented Baby Oil Gel & Almay Makeup Removing Toilettes (they're cheap, wet, and don't sting)

Day Moisturizer w/ SPF: Eucerin Everday Protection Face Lotion for Sensitive Skin SPF 30

Update 5/3/10: This is doing the trick for now but, it does seem a little "oily" to me. I do have drier skin so it's not so bad. I will give Neutrogena Dry Touch SPF 30 a try next.

Night Moisturizer:  Eucerin Q10 Anti-Wrinkle Creme

Night Treatment: Neutrogena Ageless Intensive Tone Correcting Serum Night (for dark pigmented spots)

Weekly Mask: Honey and Aspirin Mask (keeps skin blemish free)

Concealer: MAC Studio Lights (Ideal Pink-LE) top off with Benefit Powderflage.

Foundation: Revlon Colorstay or MUFE HD

Update 5/3/10: Found out a new trick...I mix Revlon Colorstay with the new Revlon PhotoReady foundation. Hello gorgeous glow that gives MUFE HD a run for it's department store money. Love it!

Setting Powder: Coastal Scents Silica Spheres Powder or MUFE HD Powder (contains the same ingrediants CS is just cheaper)

Blush: MAC Powder Blush or MAC MSF (no cream blush from MAC, way to sticky) (NARS for cream blush)

Contour/Highlight: MAC Pro Accentuate/MAC Pro Scuplt Powder

Eyehadow Primer: Eghhhh...I haven't found one yet. UDPP and L'oreal De-Crease's packaging sucks! Very wasteful.

Eyeshadow Base: NYX Jumbo Eye Pencils & MAC Paint Pots (I'm looking for a product that you can use for a primer & colored base all in one, I'll let you know how it goes)

Update 5/3/10: MAC Grease Paint Sticks are the shiiiiit. I missed them in Style Black, but was able to get B from a friend. I resently purchased Slick Black, Dirty and Charred Mauve from the Art Supplies collection. These a must haves for a smokey eye that is to die for. 

Eyeshadow: MAC However, I don't buy most of the lusters, shity texture & color pay off ; NYX Runway & Carribean Collection Palettes only. I don't like the singles b/c of the shape of the packaging, but I've heard that the texture is nice as well as the pigmentation, nor the trios b/c the texture sucks! I also like the Coastal Scents 88 palettes. I've tried the Warm & Shimmer ones and they are great for the price.

Eyeliner: Urban Decay 24/7 Pencil or Coastal Scents Gel Eyeliners

Mascara: L'oreal Voluminous Waterproof, NYX Doll Eye Waterproof, and MAC Zoom Lash

Lipstick/Lipgloss: Whatever catches my eye. I try to only buy drugstore ones, b/c I'm addicted to them so much it would cost me a small fortune if I bought all of them for department store prices, but I have tried several of the MAC ones and they're very nice.

Nail Polish: OPI, Essie, China Glaze. For a trendy color that I won't use much more than a season. I like to use Sinful Colors polishes. I also like to Franken with the Sinful Colors polishes. Sooo fun!

Brushes: Sigma. Yes, Sigma. I love them. I will continue to buy the LE FULLSIZE MAC brushes as they are released, but as far as a regular line, everyday use brush, it's Sigma. I do not use the MAC SE brushes at all. I have drugstore brushes that imo, are better quality than the MAC SE ones. See my full review post for more details.
Continue reading...

Tuesday, March 9, 2010

Sigma Brushes- SS226 vs. MAC226- SS226 Rating: ♥♥♥


I prefer the MAC226 over the SS226. Don't get me wrong the SS226 is nice, and is good brush to have. I just like the MAC one a little better. Even-though, I rather the MAC226 over the SS226 I would still recommend getting the SS226 if you could not find the MAC226 or if you just can't bring yourself to pay e-bay prices for the limited edition brush (I hear ya). The SS226 is a great alternative. It still gets the same job done. The MAC226 is a little more precisely cut, and is a little denser than the SS226. I used both brushes for application in the crease and mostly for detailed outer V work. When I do outer V work the precision cut on the MAC226 allows me to put the color exactly where I want it, instead of where the brush wants it to go. Also, the extra stiffness of the MAC226 makes it easier for me to apply my crease shade precisely. Works great if you like to cut in your crease. If not I would just blend it a bit after you use the MAC226.

I guess that would leave me to say, MAC's quality wins this one. However, the price of the SS226 may win you over if you check the prices of the MAC226 on evilbay.

Continue reading...

Sigma Brushes- SS252 vs. MAC252- SS252 Rating: ♥♥♥♥♥


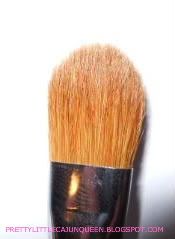
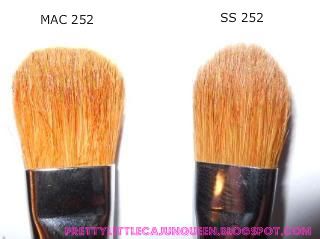
I am so impressed with this brush. Sigma did a great job with this one. They took MAC's #252 design, and made it more user friendly. The brushes do not look identical, as you can see in the pics. MAC's #252 is more of a wider square shape. Sigma's #252 is slightly narrower and oval shaped. Both brushes are filbert cut at the tip, meaning that the fibers are cut at an angle to gradually come to a sharp line at the tip. Both brushes are also made from the same soft, orangy/brown natural fibers.

The SS252 being cut in a more narrow oval shape it makes brush fit the lid better. This makes it very easy to use your brush in a side to side motion to apply a simple wash of color to the lid, which I love. I think that this brush would also work well to apply your brow highlight shade. Since the brush is filbert cut it will give you a nice controlled line of color under the brow for a great highlight. Also, since the brush is narrower, slightly thinner, and is filbert cut you might want to use this as a quick way to apply your crease shade. It would definitely work if you were in a rush or just didn't have another brush to use for the crease. I didn't use it this way this morning. I just used it to do a quick wash of Goldmine over my Indianwood Paint Pot, and it worked wonderfully.

Now, the MAC252 is slightly wider and more square so it makes it a little difficult to use it in a side to side motion for the wash of color. The shape just doesn't fit my lid. The color ends up getting where it's not meant to be when I try to use it all over the lid. With this brush I prefer to hold the brush vertically, and use it to pat the color on the lid. Perfect for foiling pigments. This brush also works very well to apply a highlight shade to the brow bone.

I really love both of these brushes, and think if you possibly can afford both, you should get both. But, if I had to pick just one brush to have. I would choose the SS252. I know, WHAT! Did you pass out??? Yeah, I really would just for the simple fact that the SS252 is so versatile. You can do a wash of color, crease application, foiling, or a highlight with just this one brush. Because of the difference in the SS252's shape it makes it a better brush, in my opinion. If your interested in this one I'd say it is a must have.

Take a look a the pics and you can see what I mean...


Continue reading...

Monday, March 1, 2010

Sigma Brushes- Introduction


Introduction 3/1/2010: I have been eying the Sigma Professional Brushes Complete Set ($69.00 USD) for quite a while now. I had decided that I would treat myself to this set for my upcoming birthday in March. Recently, while watching a makeup tutorial the guru mentioned a new Sigma brush set called the Sigma Makeup Professional Brushes Premium Kit ($149.00 USD). I had to know what it was all about. So, a few days ago my friend let me know that the new set was up on the Sigma site for sale. I rushed to go check them out. The great thing is you get totally different brushes with each set!
I am also interested in the SS #109 ($14.00 USD) and the new SS #197 ($16.00 USD) brushes that you can buy individually. I am thinking that the SS #197 brush maybe what I thought the MAC #130 brush was supposed to be. I was disappointed with the MAC #130. You can check out my review on here for that one.
So, now I will be treating myself to both of the sets, the SS #197, and the SS #109 for my birthday. I will receive them around the 10th. of March. I plan to use them for about two weeks and let you know what I think. I also will be comparing them to my MAC brushes that I already have.
I know that there is a lot of controversy about the Sigma brushes being over-rated and Sigma using MAC's number system, blah, blah, blah. Whatever. Really, I just think it's smart marketing skills on Sigma's end. If MAC didn't want this to happen they should have patented or trade marked their number system. Now, as far as the brushes being over-rated I will have to decide on the quality for myself. So many people who reviewed these brushes were given the brushes for free. I really don't think that they can be entirely truthful with us on the quality b/c of the business relationship that they have with the company. Then you have the severe MAC addicts that won't give anything a chance unless it says MAC.
Although, I am a total MAC addict I am not like that at all. If I find a great deal on a product and it works just as well as the MAC product but for half the price, I'm all over that! Depending on how the Sigma brushes perform, my MAC brush wishlist maybe significantly cut down. I love saving money, but the quality of the Sigma brushes have to be good for me to rave about them, and love them. We will see and I will let you know.

Update 3/3/10: I ordered both of the brush sets today. I spent $218 USD on both. Which, I think is one hell of a deal for 27 brushes. It ends up being about $8.07 USD for each brush. That's what I call a heck of a deal! The frickin' kick in the ass came when I had to pay $14 USD in shipping!!! You would think that they would offer free shipping with a hefty order like that. These damn things better be good!

Update 3/9/10: Well, the high ass shipping was fast, and I received my brushes today. My initial over view of the brushes is very good. They all seem well made and sturdy. You know, no loose ferrules or anything like that. All of the face brushes were extremely soft. I went ahead and gave the SS187 a good washing to see what it was going to do. My good friend who bought the travel set said that her travel size SS187 bled so badly that the white fibers turned a grayish shade. This was not the case with the one I got. It bled just slightly, not even enough to turn the water milky looking. You really couldn't even tell that it did. I was just paying very close attention, because I was worried about it. The very little color I did see did not stain the white fibers at all. So far I'm pleased with the brush, but I have not had a chance to actually use it.
Now, all this week I will be posting a review for each brush. I will compare the Sigma ones to the MAC ones that I already have. I will be doing a separate post for each Sigma bush I got. I really hope it will help you to make a good choice for yourself about the Sigma brushes. So, let the blending begin, and enjoy!
Continue reading...

Followers


Tiffany L. Prevost Esthetician & Makeup Artist Copyright © 2009 Cosmetic Girl Designed by Ipietoon | In Collaboration with FIFA
Girl Illustration Copyrighted to Dapino Colada